

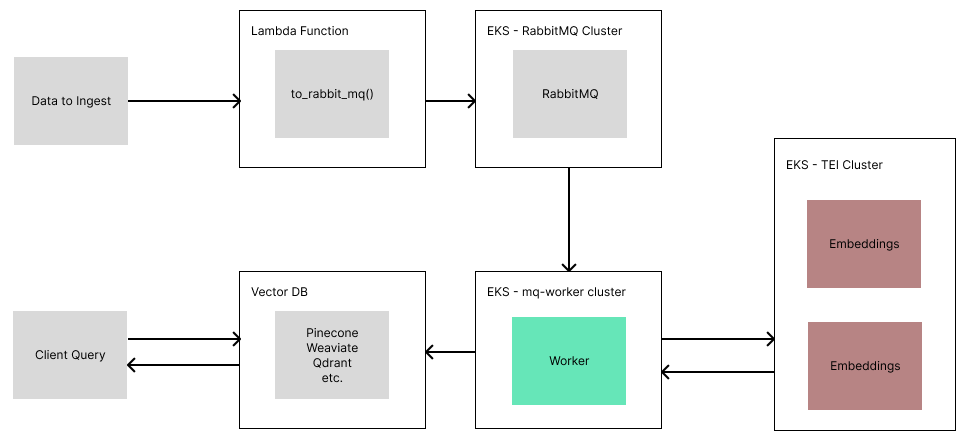
Over the holidays, I was running some retrieval benchmarks with LlamaIndex. I found myself rebuilding an index repeatedly with 30K documents, and finding waiting 10–20 minutes each time was too grating.
So to solve this, issue, I decided to bite the bullet and figure out how to deploy LlamaIndex to AWS, and create a scalable ETL pipeline for indexing my data. This brought the processing time down to around 5 minutes!
If you want to skip the detailed steps, you can jump to the code at the following repository:
https://github.com/run-llama/llamaindex_aws_ingestion
NOTE: I am not an AWS expert, and had zero experience with it before this project. There are likely ways to improve upon the design I came up with. This blog merely documents my first foray into getting a system working on AWS. My hope is that this helps other people get started, and opens the door for other engineers deploying more scale-able systems.
Step 1: Figuring out how AWS works
To use AWS effectively, there are several packages and tools that you will need:
- AWS account signup
- Install AWS CLI
- Used to authenticate your AWS account for CLI tools
- Install eksctl
- Used to create
EKSclusters easily - Install kubectl
- Used to configure and debug deployments, pods, services, etc.
- Install Docker
As you will see, nearly all AWS deployments revolve around yaml files that describe what you are deploying and how they connect together, as well as some CLI commands to actually run the deployment.
If at any time you aren’t sure what’s going on, I found it helpful to visit the AWS dashboard and explore the resources I had actually deployed. Usually, you will want to visit. I had the pages below favourited in AWS. Also, remember to set your region properly in the top right!

Note on how deployments work
For a majority of deployments, you will typically have
- The cluster
- The deployed app, scaled to X replicas
- A load balancer, to balance the incoming requests between X replicas
In the examples below, most will have a yaml for the deployed app, a yaml for the load balancer, and a command to create the cluster you want to run on.
Helpful CLI Commands
A few CLI commands proved to be extremely helpful for debugging and monitoring deployments.
# get the state of pods/deployments
kubectl get pods
kubectl get deployments

# useful for seeing logs/events of pods + full yaml config
kubectl describe pod <pod name>
kubectl logs <pod name>

# list clusters kubectl knows about
kubectl config get-contexts

# switch kubectl to another cluster
kubectl config use-context <context name>

# delete things
kubectl delete <pod/deployment/service> <name>
Step 2: Deploying Text Embeddings Interface
In order to run embeddings fast, we will deploy an embeddings server using HuggingFace’s Text Embedding Interface (TEI). This server has production-level features and optimizations out-of-the-box, including continuous batching, flash-attention, rust implementation, and more. HuggingFace provides prebuilt docker images to simplify deployment.
However, the first step to running embeddings fast is to have a GPU. If you just signed up for AWS, you will have to request a quota increase. For me, I requested a few times for G5 instances (which run an Nvidia A10G GPU), and after a few days of testing on CPU, AWS gave me access to use up to 4 G5 instances.
Once you have a quota for GPU instances (like G5 nodes), you can create your cluster and deploy
eksctl create cluster --name embeddings --node-type=g5.xlarge --nodes 1
sleep 5
kubectl create -f ./tei-deployment.yaml
sleep 5
kubectl create -f ./tei-service.yaml
sleep 5
echo "Embeddings URL is: <http://$>(kubectl get svc tei-service -o jsonpath='{.status.loadBalancer.ingress[0].hostname}')"
The code above will create a cluster, a deployment (i.e. our TEI server) and a load balancer server.
You can see the yaml configs in the repo, and you can edit them as needed.
NOTE: Make sure to write down the URL printed at the end! If you forget, you can get the URL in the EKS page on AWS. You’ll want the external IP for the load balancer.
Step 3: Deploying RabbitMQ
RabbitMQ is where we will queue documents to be ingested. RabbitMQ is a message broker system that allows for powerful yet simple queuing of tasks. Since some ingestion tasks (like metadata extraction, embeddings) can be slow, the more naive approach of a REST API would leave connections open while data is processed. Instead, using a queue allows us to quickly upload data and offload processing to scalable message consumer(s). It also allows us to add parallelism with ease, where in our system, each Document object is processed independently by a consumer.
Deploying RabbitMQ on EKS was a little tricky, but using the RabbitMQ operator installed with krew, many things are abstracted away.
First, you need to create your cluster. For whatever reason, this didn’t work unless I also specified the zones
eksctl create cluster \
  --name mqCluster \
  --zones us-east-1a,us-east-1b,us-east-1c,us-east-1d,us-east-1f
Since RabbitMQ needs storage, and each replica needs to share the same storage, we should give our cluster permission to provision and use EBS for storage. This was a frustrating step to figure out since most existing guides skip this detail!
eksctl utils associate-iam-oidc-provider \
  --cluster=mqCluster \
  --region us-east-1 \
  --approve
sleep 5
eksctl create iamserviceaccount \
    --name ebs-csi-controller-sa \
    --namespace kube-system \
    --cluster mqCluster \
    --role-name AmazonEKS_EBS_CSI_DriverRole \
    --role-only \
    --attach-policy-arn arn:aws:iam::aws:policy/service-role/AmazonEBSCSIDriverPolicy \
    --approve
sleep 5
eksctl create addon \
  --name aws-ebs-csi-driver \
  --cluster mqCluster \
  --service-account-role-arn arn:aws:iam::$(aws sts get-caller-identity --query Account --output text):role/AmazonEKS_EBS_CSI_DriverRole \
  --force
From there, we can install the RabbitMQ operator and create our deployment
kubectl apply -f <https://github.com/rabbitmq/cluster-operator/releases/latest/download/cluster-operator.yml>
sleep 5
kubectl apply -f rabbitmqcluster.yaml
sleep 5
echo "RabbitMQ URL is: $(kubectl get svc production-rabbitmqcluster -o jsonpath='{.status.loadBalancer.ingress[0].hostname}')"
As usual, the code for all this can be found in the git repo.
NOTE: Make sure to write down the URL printed at the end! If you forget, you can get the URL in the EKS page on AWS. You’ll want the external IP for the load balancer.
You can monitor your RabbitMQ queues by visiting “<rabbitmq_url>:15672” and signing in with “guest”/”guest”.
Step 4: Deploying IngestionPipeline Workers
This is where the real meat of work comes in. We need to create a consumer that will endlessly pull from our RabbitMQ queue, ingest data with the help of TEI, and then put that data into our vector db.
To do this, we can make a FastAPI server that does two things
- Starts a thread to consume from our queue
- Starts a webserver, to enable us to specify a readiness check, and gives us room to add more features in the future (i.e. probing queue status, logs, etc.)
First, we write our code, as you can see in worker.py
Then, we dockerize our app by creating a simple Dockerfile and running:
docker build -t <image_name> .
docker tag <image_name>:latest <image_name>:<version>
docker push <image_name>:<version>
With our app dockerized, we can complete the worker-deployment.yaml file by filling in
- Our embeddings URL under
TEI_URL - Our rabbit-mq URL under
RABBITMQ_URL - Our image name under container image
- Our cluster details (in this case, a weaviate URL and API key)
With the yaml file complete, now we can properly deploy the worker
eksctl create cluster --name mq-workers --zones us-east-1a,us-east-1b,us-east-1c,us-east-1d,us-east-1f
sleep 5
kubectl create -f ./worker-deployment.yaml
sleep 5
kubectl create -f ./worker-service.yaml
Step 5: Making a User-Facing Lambda Function
Our lambda function will rely on a single external dependency — pika — which is used to communicate with RabbitMQ.
Create a python file called lambda_function.py with the following code:
import pika
import json

def lambda_handler(event, context):
    try:
        body = json.loads(event.get('body', '{}'))
    except:
        body = event.get('body', {})

    user = body.get('user', '')
    documents = body.get('documents', [])
    if not user or not documents:
        return {
            'statusCode': 400,
            'body': json.dumps('Missing user or documents')
        }

    credentials = pika.PlainCredentials("guest", "guest")
    parameters = pika.ConnectionParameters(
        host="hostname.amazonaws.com",
        port=5672,
        credentials=credentials
    )

    connection = pika.BlockingConnection(parameters=parameters)
    channel = connection.channel()
    channel.queue_declare(queue='etl')

    for document in documents:
        data = {
            'user': user,
            'documents': [document]
        }
        channel.basic_publish(
            exchange="",
            routing_key='etl',
            body=json.dumps(data)
        )

    return {
        'statusCode': 200,
        'body': json.dumps('Documents queued for ingestion')
    }
The function above processes incoming requests, and publishes each document as a single message in our rabbitmq cluster.
To deploy a lambda file with dependencies, we need to create a zip of our lambda function + all dependencies. To do this, we can create a requirements.txt file with our dependencies and run:
pip install -r requirements.txt -t .
zip -r9 ../ingestion_lambda.zip . -x "*.git*" "*setup.sh*" "*requirements.txt*" "*.zip*"
With our code and zip file in hand, head over to the Lambda AWS page in your browser.
- Select
Create function - Give it a name, select a python runtime (I used Python 3.11)
- Click
Create functionat the bottom - In the code editor, you’ll see an
Upload frombutton — click that, and upload your zip file - Click test, give the test a name, and paste the following JSON
{
    "body": {"user": "Test", "documents": [{"text": "test"}]}
}
Once the test works, the Deploy button will not be grayed out, and you can click it.
Your public URL will be listed in the upper right pane under Function URL — this is the URL you can use to call your lambda function from anywhere!
Step 6: Reap the Scaling Benefits
Now, we can run our system end-to-end!
To ingest data, you can run:
import requests
from llama_index import Document, SimpleDirectoryReader

documents = SimpleDirectoryReader("./data").load_data()

# this will also be the namespace for the vector store
# -- for weaviate, it needs to start with a captial and only alpha-numeric
user = "Loganm"

# upload in batches
for batch_idx in range(0, len(documents), 30):
  documents_batch = documents[batch_idx:batch_idx+30]
  body = {
    'user': user,
    'documents': [doc.json() for doc in documents_batch]
  }

 # use the URL of our lambda function here
 response = requests.post("<lambda_url>", json=body)
 print(response.text)
Then, to use our data:
from llama_index import VectorStoreIndex
from llama_index.vector_stores import WeaviateVectorStore
import weaviate

auth_config = weaviate.AuthApiKey(api_key="...")
client = weaviate.Client(url="...", auth_client_secret=auth_config)
vector_store = WeaviateVectorStore(weaviate_client=client, class_prefix="<user>")
index = VectorStoreIndex.from_vector_store(vector_store)
Step 7: Clean-up
AWS doesn’t make it easy to estimate costs of all this. But after running and testing things for a few days, I had only spent ~$40CAD. This included leaving some services running overnight (whoops!).
When you are done with your deployment, you’ll want to delete the resources so that you aren’t charged for things you aren’t using. To delete my clusters, I ran the following:
eksctl delete cluster embeddings
eksctl delete cluster mq-worker
kubectl rabbitmq delete production-rabbitmqcluster
Then, in the AWS UI console, I deleted any remaining resources on the EC2 and CloudFormation pages, as well as double-checking that everything was deleted on the EKS page.
Conclusion
Using this setup, I was able to reduce index-construction times for creating large indexes dramatically. Before, it would take about 10–20 minutes to create the index for 25K documents, and with this setup (2 rabbitmq nodes, 2 workers, 2 embeddings), it was down to 5 minutes! And with more scaling, it could be even faster.
Next Steps
From here, there are several improvements that I can think of
- better secrets management
- adding auto-scaling
- adding a retrieval lambda function (would require making a docker image for lambda + llama-index)
- adding queue stats to the fastapi server
- deploying redis for document management on the IngestionPipeline
I encourage anyone to take this work and build off it. Be sure share any improvement on the github repository as well!