In this technical walkthrough, we’ll highlight the functionality of Tonic Validate and its integration with LlamaIndex. Sign up for a free account here before you start.
Introduction
As enterprise adoption of generative AI technologies continues, companies are turning to Retrieval Augmented Generation (RAG) systems to extend the application of large-language models (LLMs) to their private data (e.g., a chatbot that can answer questions based on internal technical documentation). Traditionally in software engineering, companies have placed a high emphasis on implementing continuous integration tests to ensure systems remain performant when updates are made. More recently, these same principles have been applied to machine learning models in production.
However, as a young technology, RAG currently lacks best practices for integration tests to ensure breaking changes aren’t introduced to the production system. In this article, we will demonstrate how you can use Tonic Validate’s RAG performance monitoring capabilities, LlamaIndex, and GitHub Actions to create novel integration tests that alert you to changes in RAG system performance. To make things easy, Tonic Validate is available natively within LlamaIndex’s core library — you can read more about that here.
What is Tonic Validate?
Tonic Validate is a RAG benchmarking and evaluation platform that monitors performance of RAG systems in production. It provides comprehensive metrics for measuring the performance of each component in your RAG system, visualizations for comparing performance across time as the system changes, and workflows for creating benchmark question-answer sets and reviewing LLM responses. Tonic Validate shines a light on how your RAG system is truly performing, enabling continuous performance monitoring of your production RAG systems. You can learn more and sign up for a free account.
Setting up LlamaIndex
To get started, let’s create an example RAG system for us to test. In this case, LlamaIndex provides a tool called create-llama which can generate a full-stack RAG application for us. To install it, we need to make sure we have Node.JS installed and run the following command:
npx create-llama@latestThis command will take you through a series of prompts. Here are the options to select for each prompt:
What is your project named? » llama-validate-demo
Which template would you like to use? » Chat without streaming
Which framework would you like to use? » FastAPI (Python)
Would you like to install dependencies automatically? » No
Which model would you like to use? » gpt-4–1106-preview
Which data source would you like to use? » Use an example PDF
Would you like to use a vector database? » No, just store the data in the file system
Once these options are selected, your project should be created in a folder called llama-validate-demo. For this demo, we are going to replace the example PDF create-llama provides with our own larger dataset. The dataset consists of a collection of essays from Paul Graham’s blog. This should more closely replicate a real world scenario where a company runs RAG on a larger internal dataset. To add the essays, download them from our Github and unzip them inside the root folder of your created project. Make sure the unzipped folder is named data. Be sure to delete any existing files in the folder before copying the new dataset.
After you have the essays in the right directory, you can set up your OpenAI API key by setting it as an environment variable called OPENAI_API_KEY. You can do this either via setting the environment variable system wide or by creating a .env file in the root folder of your create-llama project. Then you can run the following commands in the root folder for your create-llama project:
poetry install
poetry shell
python app/engine/generate.py
This will install the dependencies and generate the RAG embeddings for the Paul Graham essays. After this, you can run the chatbot with:
python main.pyTo test the chatbot, you can send a request via curl:
curl - location 'localhost:8000/api/chat' \
 - header 'Content-Type: application/json' \
 - data '{ "messages": [{ "role": "user", "content": "In the early days, how were the Airbnb founders financing their startup?" }] }'
LlamaIndex will then return a response:
{
    "result": {
        "role": "assistant",
        "content": "In the early days, the Airbnb founders financed their startup by creating and selling themed breakfast cereals. They created limited-edition cereal boxes, such as \"Obama O's\" and \"Cap'n McCain's,\" during the 2008 U.S. presidential election, which became a collectible and helped them raise funds for their company. This creative approach to funding allowed them to sustain the business in its initial phase before securing more traditional forms of investment."
    }
}
Finally, in llama-validate-demo/app/api/routers/chat.py we want to replace the return _Result line at the end of the chat function with the following.
return _Result(
    result=_Message(
        role=MessageRole.ASSISTANT,
        content=response.response,
        context=[x.text for x in response.source_nodes]
    )
)
This allows the LlamaIndex API to return the RAG context that was used to answer the question asked. Now, we can move on to setting up Tonic Validate!
Setting up Tonic Validate
To set up Tonic Validate, first install it via poetry:
poetry add tonic-validateNow, we can create our tests for Tonic Validate. To get started, create a file inside llama-validate-demo/tests called validate_test.py. We will also need to create a list of test questions and answers which you can find here. Alternatively, you can also use the Tonic Validate UI to create the test set and call it via the SDK — we’ll be adding a feature to help generate these benchmarks using synthetic data to make this process even easier. Download the qa_pairs.json file from the link and paste it into llama-validate-demo/tests. Once we have both of these files, we can add the following code into validate_test.py.
import json
import os
from tonic_validate import ValidateApi
from tonic_validate.metrics import AnswerSimilarityMetric, RetrievalPrecisionMetric, AugmentationPrecisionMetric, AnswerConsistencyMetric
from llama_index.evaluation import TonicValidateEvaluator
import requests

from dotenv import load_dotenv

load_dotenv()

def get_llm_response(prompt):
    url = "http://localhost:8000/api/chat"

    payload = json.dumps({
        "messages": [
            {
                "role": "user",
                "content": prompt
            }
        ]
    })
    headers = { 'Content-Type': 'application/json' }
    response = requests.request("POST", url, headers=headers, data=payload).json()
    result = response['result']
    return result['content'], result['context']
This code sets up the dependency imports and also specifies a get_llm_response function which sends a request to the LlamaIndex API server we set up earlier to get a response. Now, let’s create a function that gets the list of questions to ask LlamaIndex for our testing.
def get_q_and_a():
    # Load qa_pairs.json
    qa_pairs = json.load(open('./tests/qa_pairs.json'))
    return ([x['question'] for x in qa_pairs], [x['answer'] for x in qa_pairs])
This function gets the question-answer pairs from our json file. The questions are what we will ask the RAG system and the answers are the correct answers for those questions. For instance, if the question was “What is the capital of France?” then the answer would be “Paris”.
Next, we can add the code that queries LlamaIndex:
def get_responses(questions):
    llm_answers = []
    context_lists = []
    for item in questions:
        llm_answer, llm_context_list = get_llm_response(item)
        llm_answers.append(llm_answer)
        context_lists.append(llm_context_list)
    return (llm_answers, context_lists)
This code iterates over the questions, queries LlamaIndex, and logs each response into an array. We have two arrays. One is the actual answer from LlamaIndex. The other is a list of the snippets of text (called the context list) that LlamaIndex provided to help the LLM answer the question.
Now we have a list of LLM responses generated from a list of test questions. Let’s score them:
def score_run(questions, context_lists, reference_answers, llm_answers):
    metrics = [
        AnswerSimilarityMetric(),
        RetrievalPrecisionMetric(),
        AugmentationPrecisionMetric(),
        AnswerConsistencyMetric()
    ]
    scorer = TonicValidateEvaluator(metrics, model_evaluator="gpt-4-1106-preview")
    run = scorer.evaluate_run(
        questions, llm_answers, context_lists, reference_answers
    )
    return run, metrics
We first need to define the metrics in Tonic Validate that we want to use. You can find a list of available metrics and their definitions here. After we create the metrics, we can take advantage of Tonic Validate’s integration with LlamaIndex. Since Tonic Validate is built into LlamaIndex’s evaluation framework as an evaluator, all we need to do is create a TonicValidateEvaluator, which scores the LlamaIndex responses across the chosen metrics. Then we return the results along with the metrics.
Finally, we can create our test function for pytest which evaluates LlamaIndex.
def test_llama_index():
    questions, reference_answers = get_q_and_a()
    llm_answers, context_lists = get_responses(questions)
    run, metrics = score_run(questions, context_lists, reference_answers, llm_answers)
    # Upload results to web ui
    validate_api = ValidateApi()
    # Get project id from env
    project_id = os.getenv("PROJECT_ID")
    validate_api.upload_run(project_id, run)
This runs all the code we’ve written to get the scores and then sends them to Tonic Validate’s API to visualize in the UI. In order to send the metrics for each run to the UI, you need to sign up for a free account, which you can do here. I highly recommend utilizing the UI to make visualizing and monitoring performance changes a breeze. Once you sign up, you will be taken through a short onboarding process where you create an API key and a project. The API key should be stored in an environment variable called TONIC_VALIDATE_API_KEY and the project ID in an environment variable called PROJECT_ID.
Once you have set up your account and configured your environment variables, you can run the test via the following commands:
poetry shell
pytest
You can also make the test fail if the metrics score too low. This would be a pertinent step to add in if you want to avoid introducing breaking changes to a production RAG system; for example, if you update the model version and the answer similarity score suddenly drop below a certain threshold, you could have the test fail and issue a warning to debug the issue.
# Check none of the metrics scored too low
for metric in metrics:
    if metric.name == AnswerSimilarityMetric.name:
        assert run.overall_scores[metric.name] >= 3.5
    else:
        assert run.overall_scores[metric.name] >= 0.7
Setting up GitHub Actions
With LlamaIndex and Tonic Validate configured, we have the ability to connect data to an LLM and measure the accuracy of LLM responses. You can push this setup into production and have a functional chatbot. As is common in modern software development practices, you will likely continue to fix bugs, make improvements, and add new data or features to your RAG system. Before pushing to production, QA testing is in place to catch any changes to your code that may introduce unintended effects. For example, adding a new dataset or updating an LLM to a new version could lead to changes in the quality of responses. One approach, the one that we recommend, for adding QA testing for your RAG system is to use GitHub Actions to establish an integration test using Tonic Validate that checks the LLM response quality of your RAG system, allowing you to catch and rectify any performance degradation before it is pushed into production.
To set up Tonic Validate to run in GitHub Actions, we can create a folder llama-validate-demo/.github/workflows with a file called python-app.yml. In this file, we will include the following code configuration that defines the integration test workflow:
# This workflow will install Python dependencies and run tests with LlamaIndex

name: Python application

on:
  push:
    branches: [ "main" ]
  pull_request:
    branches: [ "main" ]

permissions:
  contents: read

jobs:
  build:

    runs-on: ubuntu-latest
    environment: Actions

    steps:
    - uses: actions/checkout@v3
    - name: Set up Python 3.11
      uses: actions/setup-python@v3
      with:
        python-version: "3.11"
    - name: Install dependencies
      run: |
        python -m pip install --upgrade pip
        pip install poetry
        poetry config virtualenvs.create false
        poetry install --no-root --no-dev --no-directory
    - name: Set PYTHONPATH
      run: echo "PYTHONPATH=$GITHUB_WORKSPACE" >> $GITHUB_ENV
    - name: Set up vector index
      env:
        OPENAI_API_KEY: ${{ secrets.OPENAI_API_KEY }}
      run: |
        python app/engine/generate.py
    - name: Start up test server
      env:
        OPENAI_API_KEY: ${{ secrets.OPENAI_API_KEY }}
        MODEL: gpt-4-1106-preview
      run: |
        python main.py &
        sleep 10
    - name: Test with pytest
      env:
        OPENAI_API_KEY: ${{ secrets.OPENAI_API_KEY }}
        TONIC_VALIDATE_API_KEY: ${{ secrets.TONIC_VALIDATE_API_KEY }}
        PROJECT_ID: ${{ secrets.PROJECT_ID }}
      run: |
        pytest
This configures GitHub to run the tests defined with Tonic Validate upon every commit. The GitHub Actions configuration downloads the repo, sets up the dependencies, generates the embeddings, and then starts up the test server and runs the test.
After this file is set up, we just need to set our secrets in GitHub. In GitHub, go to Settings > Secrets and variables > Actions for your repo and create a secret called OPENAI_API_KEY, TONIC_VALIDATE_API_KEY, and PROJECT_ID. These values will all be the same as the values you set earlier. Now your GitHub actions set up is complete and you can proactively monitor changes to your RAG system during development and before going into production.
Try pushing some commits to it and watch it run! To view the results, go to Tonic Validate’s web app and navigate to your project. You should see a view like this that shows recent metrics and their evolution over time:
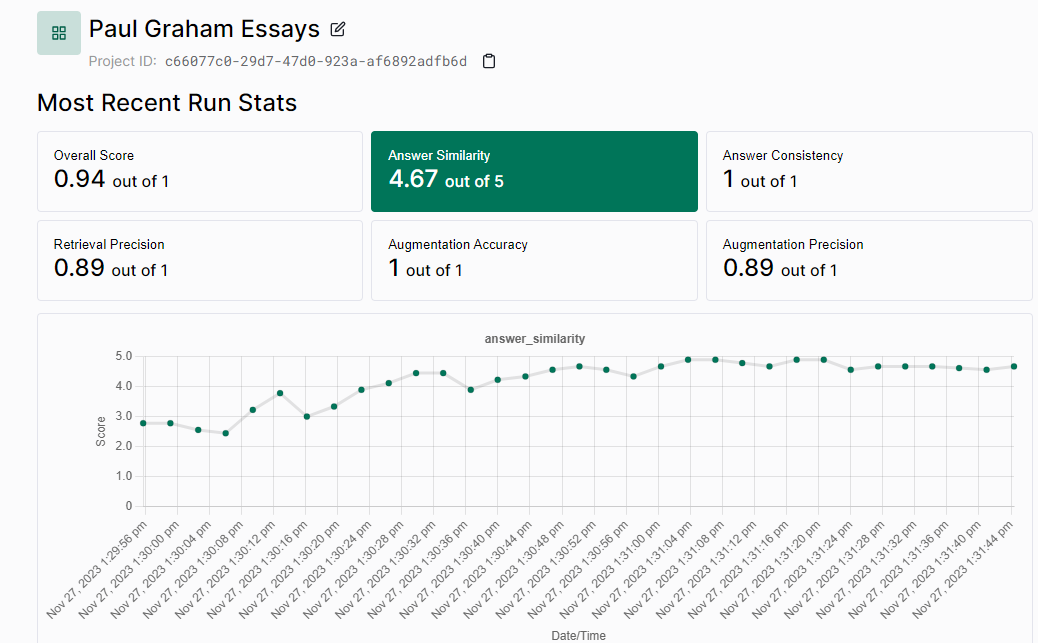
Now you and your team can track your RAG system’s performance over time to make sure there aren’t any dips in performance! Thank you for reading and make sure to check out Tonic Validate!
For more information on Tonic Validate, visit our website and sign up for a free account today. You can also visit our GitHub page to view all of the code used in this post and the rest of our SDK. Our LlamaIndex integration is available here.